The Hidden Frustrations Behind AI Image Generation
Let's skip the dramatic backstories. You probably typed a simple idea into an AI tool, expecting a masterpiece, but got a melted, seven-fingered nightmare instead. It is incredibly frustrating, I know. But here is the good news: your imagination is fine. You just aren't speaking the machine's specific language yet. Today, we are going to fix those weird image generations for good with a practical system that actually works.We have all been there. You sit down at your computer, excited to create a stunning piece of digital art. You type a simple sentence into your AI tool, expecting a masterpiece.
Instead, the result is a complete disaster. The faces look melted, the hands have seven fingers, and the background makes absolutely no sense.
According to experts exploring generative AI models, this technology learns from billions of data points. However, without the exact right instructions, the system gets completely confused.
This daily struggle is incredibly frustrating for ordinary people just trying to bring their ideas to life. You waste hours typing different words, hoping for a better result, but nothing seems to work. We naturally look for top free AI tools that save hours of work, but a tool is only as good as the person giving the commands.
Why do so many people fail to find the right solution?
- Information Overload: The internet is full of confusing, overly technical guides that are impossible for beginners to understand.
- Blind Copy-Pasting: Many people just copy prompts from others without understanding how the underlying formula actually works.
- The Algorithm Mystery: Every AI model interprets words differently, leaving users guessing and wasting their daily credits.
Myth vs. Fact: AI Art Prompts
- Myth: Writing longer, massive prompts will automatically give you better images.
- Fact: Adding too many words confuses the AI. Keep your instructions under 60 words for the cleanest results.
- Myth: You need a background in coding to make good AI art.
- Fact: Not at all! You just need a simple formula: Subject + Environment + Lighting.
This constant trial and error takes a massive toll on your creative confidence. When you cannot get the image you want, you start feeling like you lack creativity.
- Wasted Time: Hours are lost tweaking a single word, destroying your mental peace and productivity.
- Creative Burnout: Seeing constantly distorted images kills your motivation to keep trying.
- Financial Drain: Wasting paid credits on failed images feels like throwing hard-earned money out the window.
You do not need to be a professional programmer to fix this. You just need a clear, proven system.

The Complete Step-by-Step Formula for Photorealism
Creating a realistic image is not about luck. It is about speaking a language the machine deeply understands.
Let me walk you through the exact, science-backed steps you can apply today. I promise this will change how you approach AI art forever.
If you are a visual learner, watch this quick video below where you can see this exact prompt-building formula in action on screen, and then keep reading the rest of the guide to discover the hidden settings most beginners completely miss.
Step 1: Build a Highly Structured Prompt Foundation
The biggest mistake you can make is typing conversational sentences. AI does not read like a human reads a book.
It reads your prompt as a list of independent variables. You must organize your words into specific categories for the best results.
The Subject and Action
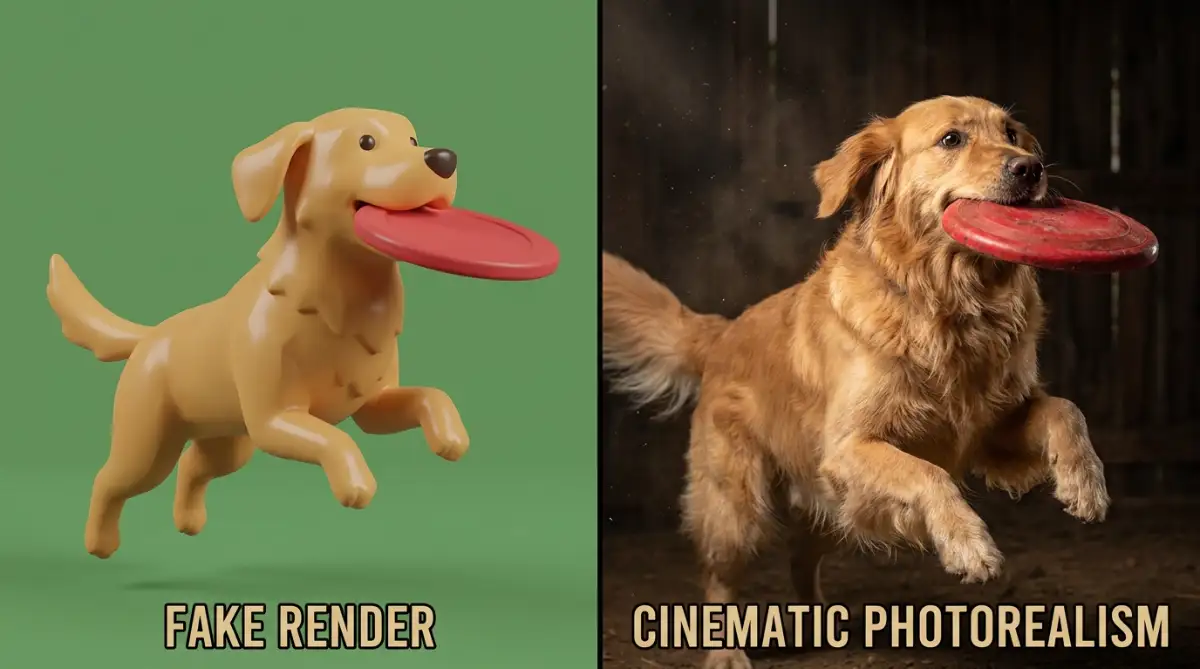
Start with the absolute main focus of your image. Be extremely specific. Do not just say "a dog." Say "a golden retriever catching a red frisbee."
The more detailed your subject is, the less the AI has to guess. This reduces the chances of bizarre, mutated features.
The Surrounding Environment
Next, tell the tool exactly where this action is taking place. Is it an empty street? A crowded coffee shop?
If you leave the background blank, the AI will fill it with random noise. Always give your subject a clear home.
The Lighting Profile
Lighting is the secret ingredient to photorealism. Bad lighting makes an image look like a cheap video game.
Use specific lighting terms like "golden hour natural sunlight," or "dramatic cinematic studio lighting." This tells the engine exactly how to cast shadows, which immediately tricks the human eye into seeing a real photo.
Step 2: Choose the Right Tool for Your Specific Goal
Not all AI image generators are built the same. Understanding the science behind these tools is key to your success.
When to Use Midjourney
Midjourney is widely considered the king of artistic realism. It excels at creating highly textured, deeply emotional photographs.
If you want an image that looks like it was shot on an expensive camera by a professional photographer, this is your best option. However, it sometimes struggles with exact text instructions.
When to Use DALL-E 3
DALL-E 3 is built for exact instruction following. It understands complex requests beautifully.
If you need a specific character doing three different things while holding a sign with actual words on it, DALL-E 3 will rarely fail you. It is highly obedient but can sometimes look a bit more illustrative than real life.
Testing the Waters
I recommend starting with one tool and learning its unique habits. Do not bounce between five different tools on your first day.
Pick one, learn how it reads your prompts, and master its specific settings before moving on.
Quick Cheat Sheet: Midjourney vs. DALL-E 3
| Feature | Midjourney | DALL-E 3 |
| :--- | :--- | :--- |
| Best For | Photorealism, moody lighting, and textures | Exact text accuracy and following rules |
| How to Access | Discord app or Midjourney website | Inside ChatGPT Plus |
| Prompt Style | Needs camera lens keywords to look real | Understands plain, simple English better |
Step 3: Speak the Language of Professional Photography
If you want realistic images, you need to use words that real-life photographers use. AI models are trained on millions of stock photos.
Those photos have specific data attached to them, like camera models and lens sizes.
Specify Your Camera Gear
Add terms like "shot on 35mm lens" or "Sony A7R IV." This forces the AI to mimic the exact quality, depth of field, and color science of those expensive cameras.
It is truly amazing how just adding a camera brand can turn a plastic-looking face into a highly detailed portrait.
Control the Camera Angle
Do you want a close-up or a wide shot? Use directional words. Try "extreme close-up macro shot" for detailed textures.
Use "drone aerial view" if you want a massive landscape. Controlling the angle gives your image a distinct, purposeful composition.
Dial in the Film Stock
For an even more realistic touch, name specific film stocks. Terms like "Kodak Portra 400" or "Fujifilm Superia" add a natural grain and color tone to your image.
This completely removes the "too smooth" digital look that often gives AI away.
Mastering the Art of Clarity and Simplicity
It is easy to think that adding a hundred descriptive words will make your image better. In reality, too many words confuse the system.
The AI tries to include every single word you type. If you ask for a "sunny day" but also say "dark and moody," the system will crash these ideas together, creating a mess.
Keep your instructions highly focused. Think of your prompt like a recipe.
You need a clear base, a few strong spices, and the right cooking method. If you throw everything in your kitchen into the pot, the meal is ruined.
My biggest personal mistake used to be writing massive, paragraph-long prompts thinking more words would automatically make the image better. Once I finally learned to stop using useless filler words like "amazing" or "epic," my AI art instantly started looking like real, professional photography
By following this exact structure—Subject, Environment, Lighting, and Photography Terms—you take total control. You stop guessing and start creating deliberately.
Advanced Secrets for Professional AI Artists
Now that you have the basic formula down, it is time to move to the expert level. This is where you separate yourself from the amateurs.
If you want to maintain long-term success and consistency, you need to understand the deeper mechanics of these tools.
Step 4: The Incredible Power of Negative Prompts
Most people only tell the AI what they want to see. Professionals also tell the AI exactly what they do not want to see.
This is called negative prompting, and it is a massive game-changer for realism.
Removing the Flaws
In tools that allow negative prompts, you can simply type a list of unwanted traits. Common negative prompts include: "ugly, mutated, extra fingers, blurry, cartoon, illustration, bad anatomy."
By explicitly banning these elements, you force the AI to filter out its worst habits.
Cleaning Up the Background
Sometimes your subject looks great, but there is random trash or weird text floating in the background. You can use negative prompts to clean this up.
Simply add "text, watermarks, messy background, clutter" to your negative list. The result will be a beautifully clean and professional image.
Step 5: Locking Down Consistency with Seed Numbers
One of the biggest struggles is getting the same character to appear in different images. AI loves to randomize every single generation.
Building a consistent brand or story can seem impossible. This is highly similar to trying to build a business without resources—but just as you can discover how to borrow money without collateral with the right strategy, you can lock in consistency using a hidden feature called "Seeds."
Understanding the Seed
Every time an AI generates an image, it assigns it a random identification number, known as a seed. This seed dictates the exact starting noise pattern used to build your picture.
If you generate an image you love, you can ask the tool for its seed number.
Reusing the Recipe
When you create your next prompt, you simply attach that exact same seed number to the end of it. This tells the AI, "Hey, use the exact same starting point as last time."
While it might not give you a 100% identical face every single time, it keeps the style, colors, and overall vibe incredibly consistent. This is a must-know secret for creating comic books, brand mascots, or consistent blog images.

Step 6: Utilizing Aspect Ratios for Platforms
A square image is not always what you need. If you are creating a thumbnail for a video, you need a wide image. If you are posting on social media stories, you need a tall image.
Setting the Frame
Do not try to crop a square image later. It ruins the composition. Instead, tell the AI the exact dimensions you want from the very start.
In many tools, you can use parameters like "--ar 16:9" for widescreen or "--ar 9:16" for vertical phone screens.
Why This Matters for Realism
When the AI knows the exact frame size, it composes the subject perfectly within that space. It calculates the background and foreground to match a real camera lens looking through that specific viewfinder.
The Biggest Pitfalls That Ruin Your AI Art
Even with the best tips, it is very easy to fall into bad habits. Let us look at the top five common mistakes people make, and how they completely ruin the final image.
1. The Word Salad Mistake
The most common error is "prompt bloat." People write an entire essay, throwing in words like "masterpiece, trending on ArtStation, 4k, 8k, ultra-detailed, awesome, epic."
These filler words do absolutely nothing. They actually dilute your main subject. The AI gets distracted by the fluff and forgets to render your actual character properly. Keep it clean and highly descriptive.
2. Ignoring the Lighting Completely
I mentioned this earlier, but it is worth repeating. If you do not specify the lighting, the AI uses a flat, generic digital light.
This makes everything look like cheap 3D software. A real photograph has shadows, highlights, and contrast. If you ignore lighting, you completely kill any chance of true realism.
3. Giving Up After the First Try
AI image generation is highly iterative. The very first image you get is rarely perfect.
Many beginners try once, get a weird hand, and declare the tool useless. Professionals will regenerate a prompt 10, 20, or 30 times. They tweak one word at a time until the image matches their vision perfectly. Patience is absolutely required.
4. Contradicting Your Own Instructions
Sometimes we accidentally ask for impossible things. You might ask for a "bright sunny day" but also ask for "heavy dark rain clouds."
The AI tries to mash these opposites together, resulting in a confusing, unrealistic sky. Always read your prompt out loud to ensure it makes logical sense in the real world.
5. Overcomplicating the Subject
Asking a single AI generation to feature a dog running, a cat sleeping, a bird flying, and a human drinking coffee all at once is a recipe for disaster.
The AI struggles with complex multi-subject interactions. The more subjects you add, the higher the chance of mutated limbs and merged bodies. Stick to one or two clear subjects per image.
Your Next Steps to Mastering AI Artwork
You now hold the exact blueprint for generating stunning, highly realistic images. You know the importance of a structured prompt, the secret language of camera lenses, and the hidden power of negative prompting.
You also know exactly which mistakes to avoid so you do not waste your time and credits.
When I finally cracked this formula, it felt like pure magic seeing my exact thoughts pop up on the screen perfectly. I promise you that if you start applying these simple rules today, you will never have to stare at a frustrating, messed-up AI image again.discussed today and test it out. Adjust the lighting, change the camera angle, and watch how the image completely transforms before your eyes.
Remember, every expert started as a beginner. There will still be moments of frustration, but you now have a logical system to overcome them.
Keep your prompts clean, stay patient, and enjoy the incredible process of bringing your imagination to life. Your journey into creating breathtaking digital art starts today!